Last post was about smoke, particles and weird looking ball things.
This post is about the audio for the video.
I wanted to make a sort of windy / underwater muffled sound, and managed to get somewhat close to what I wanted, just using Houdini CHOPs!
Pulse Noise
I decided not to create the audio in the same hip file, since it was already getting a bit busy, and because the data I want to use is already cached out to disk (geometry, pyro sim, etc).
The new hip file just has a small geometry network and a chops network.
Here’s the geometry network:

I wanted the audio to peak at times where the pulse was peaking on the tuber bulbs, so the first step was to import the bulbs geometry:

Next I’m promoting the pulse amount from points to detail, using “sum” as the promotion method (this adds up all the pulse amounts for all points in the bulbs every frame).
I don’t care about the geometry any more, because the sum is a detail attribute, so I delete everything except for a single point.
I had a bit of a hard time working out how to bring the values of a detail attribute into CHOPs as a channel. I think it should be simple to do with a Channel CHOP, but I didn’t succeed at the magic guessing game of syntax for making that work.
Anyway, since importing point positions is easy, I just used an attribute wrangle to copy the pulse sum into the position of my single point:
@P = detail(@opinput1, "pulse");
Audio synthesis fun
I had some idea of what I wanted, and how to make it work, from experiments in other software (Supercollider, PureData, etc).
I found that creating an interesting wind sound could be achieved through feeding noise into a lowpass filter.
I also tried this out in Unity, grabbing the first C# code I could find for filters:
https://stackoverflow.com/questions/8079526/lowpass-and-high-pass-filter-in-c-sharp
Here is a Unity MonoBehaviour I built from that code above:
using System;
using System.Collections;
using System.Collections.Generic;
using UnityEngine;

[RequireComponent(typeof(AudioSource))]
public class PlayerAudio : MonoBehaviour
{
    AudioSource _requiredAudioSource;
    public int _samplerate = 44100;

    private const float _resonance      = 1.0f;
    private float _phase                = 0.0f;
    private float _rampInAmount         = 0.0f;
    private float _frequency            = 800.0f;
    private System.Random _rand1        = new System.Random();
    private float[] _inputHistory       = new float[2];
    private float[] _outputHistory      = new float[3];

    void Start ()
    {
        _requiredAudioSource = GetComponent<AudioSource>();
        AudioClip testClip = AudioClip.Create("Wind", _samplerate * 2, 1, _samplerate, true, OnAudioRead);
        _requiredAudioSource.clip = testClip;
        _requiredAudioSource.loop = true;
        _requiredAudioSource.Play();
    }

    void Update ()
    {
        _rampInAmount = Mathf.Min(_rampInAmount + (Time.deltaTime/2.0f), 1.0f);
    }

    void OnAudioRead(float[] data)
    {
        float c, a1, a2, a3, b1, b2;

        for (int i = 0; i < data.Length; i++)
        {
            // Create a random amplitude value
            double currentRand  = _rand1.NextDouble();
            float amplitudeRand = (float)(currentRand * 2.0f - 1.0f) * _rampInAmount;
            amplitudeRand /= 2.0f;

            // Phase over a few seconds, phase goes from 0 - 2PI, so wrap the value
            float randRange = Mathf.Lerp(-1.0f, 1.0f, (float)currentRand);
            _phase += 1.0f / _samplerate;
            _phase += randRange * 200.0f / _samplerate;
            _phase %= (Mathf.PI * 2.0f);

            float interpolator = (Mathf.Sin(_phase) + 1.0f) / 2.0f;
            _frequency = Mathf.Lerp(100, 200, interpolator);

            // Low pass filter
            c = 1.0f / (float)Math.Tan(Math.PI * _frequency / _samplerate);
            a1 = 1.0f / (1.0f + _resonance * c + c * c);
            a2 = 2f * a1;
            a3 = a1;
            b1 = 2.0f * (1.0f - c * c) * a1;
            b2 = (1.0f - _resonance * c + c * c) * a1;

            float newOutput = a1 * amplitudeRand + a2 * this._inputHistory[0] + a3 * this._inputHistory[1] - b1 * this._outputHistory[0] - b2 * this._outputHistory[1];

            this._inputHistory[1] = this._inputHistory[0];
            this._inputHistory[0] = amplitudeRand;

            this._outputHistory[2] = this._outputHistory[1];
            this._outputHistory[1] = this._outputHistory[0];
            this._outputHistory[0] = newOutput;

            data[i] = newOutput;
        }
    }
}
It’s pretty gross, doesn’t work in webgl, and is probably very expensive.
But if you’re a Unity user it might be fun to throw in a project to check it out 🙂
I take no responsibility for exploded speakers / headphones…
With that running, you can mess with the stereo pan and pitch on the Audio Source, for countless hours of entertainment.
Back to Chops
When testing out Audio in a hip file, I could only get it to play if I use the “Scrub” tab in the audio panel.
You need to point it to a chopnet, and make sure that the chopnet is exporting at least one channel:

You should also make sure that the values you output are clamped between -1 and 1, otherwise you’ll get audio popping nastiness.
The CHOP network I’m using to generate the audio looks like this:

What I’d set up in Unity was a channel of noise that is run through a High Pass filter with a varying Cutoff amount.
I tried to do exactly the same thing in Houdini: Created a noise chop, a Pass Filter chop, and in the Cutoff field sample the value of the noise chop using an expression:
chop("chan1")
I was hoping that the whole waveform would be modified so I could visualize the results in Motion FX View, but what I found instead is that the waveform was modified by the current frames noise value in Motion FX.
With my limited knowledge of CHOPs, it’s hard to describe what I mean by that, so here’s gif of scrubbing frames:

It’s likely that it would still have given me the result I wanted, but having the wave form jump around like that, and not being able to properly visualize it was pretty annoying.
So, instead of creating noise to vary the high pass cutoff, I instead created a bunch of noise channels, and gave each of them their own high pass cutoff, then I blend those together (more on that part later).
In my Pass Filter, I created two new parameters (using Edit Parameter Interface) that I refence from a few different nodes:

Through trial and error, I found that low cutoff values from 0.3 to 0.6 gave me what I want, so I use an expression to filter each of the channels with a cutoff in that range, based on the channel ID:
ch("baseCutoff") + (fit($C/(ch("passBands")-1), 0, 1, 0.2, 0.5))
The baseCutoff is sort of redundant, it could just be built into the “fit” range, but I was previously using it in other nodes too, and never got around to removing it 🙂
I’m using the “passBands” parameter in that expression, but I also use it in the Channel creation in the noise CHOP:

It probably would have been more sensible just to hard code the number of channels here, and then just count how many channels I have further downstream, but this works fine 🙂
In the Transform tab of the noise, I’m using $C in the X component of the Translate, to offset the noise patterns, so each channel is a bit different. In hindsight, using $C in the “seed” gives a better result.
So now I have some channels of filtered noise!
I’ll keep passBands to 5 for the rest of this post, to keep it easy to visualize:

Combining noise and pulse
The top right part of the CHOP network is importing the pulse value that I set up earlier.

I’m importing a single point, and the pulse value was copied into Position, as mentioned earlier.
I’m deleting the Y and Z channels, since they are the same as X, normalizing the data using Limit, moving the data into the 0-1 range, and then lagging and filtering to soften out the data a bit.
Here is what the pulse looks like before and after the smoothing:

So this pulse channel is tx0, and I merge that in with all the noise channels (chan1-x).
I want to use the value of this pulse channel to blend in the noise channels I previously created.
So, for example, if I have 4 bands: between 0 and 0.25 pulse value I want to use band 1 noise, between 0.25 and 0.5 I’ll use band 2, 0.5 and 0.75 use band 3, etc.
I didn’t want a hard step between bands, so I’m overlapping them, and in the end I found that having quite a wide blend worked well (I’m always getting a little of all noise channels, with one channel dominant).
This all happens in the vopchop_combineNoiseAndPulse:

The left side of the network is working out the band midpoint ((1 / number of channels) * 0.5 * current channel number).
The middle section gets the current pulse value, and finds how far away that value is from the band midpoint for each channel.
If I just output the value of that fit node, and reduce the overlap, hopefully you can see what this is doing a little more obviously:

As the red line increases, it goes through the midpoints of each noise band, and the corresponding noise channel increases in intensity.
Since I’ve lowered the overlap for this image, there are actually gaps between bands, so there are certain values of the pulse that will result in no noise at all, but that’s just to make the image clearer.
The rest of the network is multiplying the pulse value with the noise channel value, and I end up with this:

With that done, I delete the pulse channel, and I add all the noise channels together.
The last thing I’m doing is outputting the noise in stereo, and for that I’m just arbitrarily panning the sound between two channels using noise.
I create two new stereo noise channels together, and then use a vop to flip the second channel:

So I end up with this:

I multiply this back on the original noise:

There’s a few other little adjustments in there, like making sure the amplitude is between -1 and 1, etc.
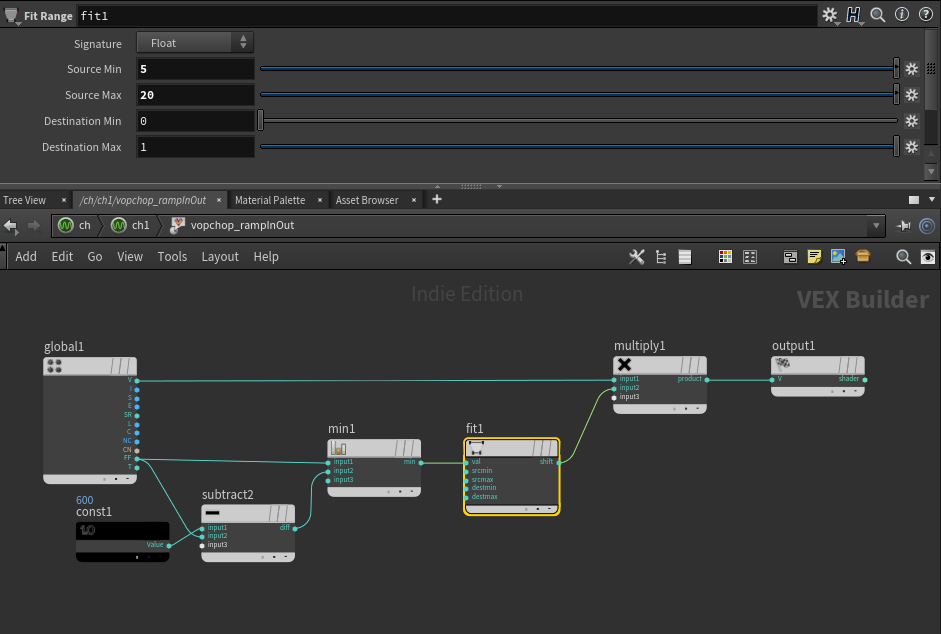
Also, I ramp in and out the audio over the first and last 20 frames:
And that’s it!
Hopefully you’ve enjoyed this series breaking down the squab video and my adventures in CHOPs. I can’t imagine I’ll use it for audio again, but it was definitely a fun experiment.
Today is Houdini 17 release day, so I can’t wait to dig in, and play around with all the new interesting features, perhaps there will be some vellum sims for future blog posts 🙂
