Complicated materials are a per-pixel, per frame cost, so it’s not always easy to justify making them.
For example, my tiling vertex-painted metal materials:
https://geofflester.wordpress.com/2014/08/28/checkmate-checker-plate/
This could easily have just been a uniquely unwrapped 2048 tiled texture set, with the detail painted where I want it. The way I set it up allows for memory savings, and re-usability, but sacrifices performance for that.
The best justification for complex materials is for surfaces that change / react to the environment and/or gameplay, because then you don’t really have a choice but to make an expensive material 🙂
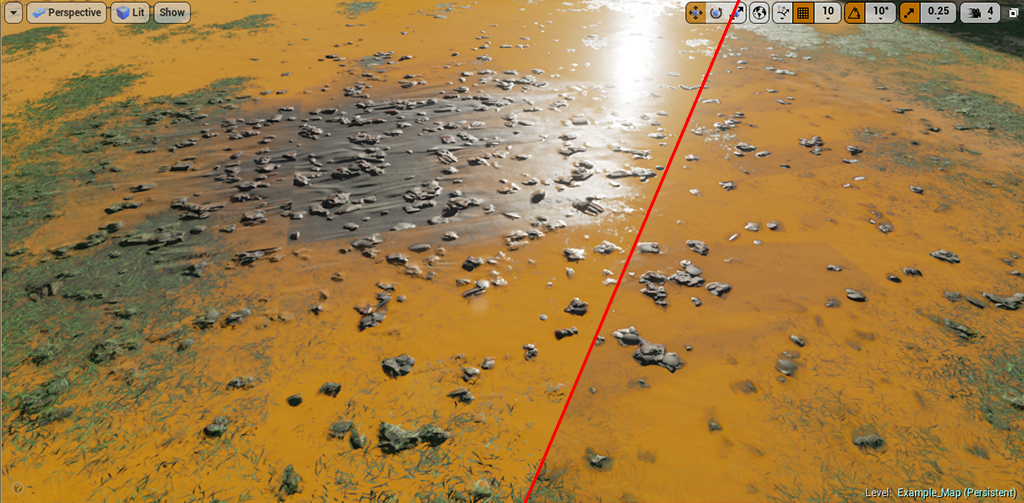
I’ve been planning for a while to make some good examples of more necessary complex materials. I started out on a desert scene with swirling sands, but that didn’t really end up where I wanted it, so I’ve gone with a slightly more standard “wet ground” effect:
I won’t go into detail on the Blueprint setup, it just increases / decreases the water level as the player stands in front of the floating red valve. There is a volume around it, and as you move in and out of the volume, the direction of water flow changes.
The water height value feeds into this material:
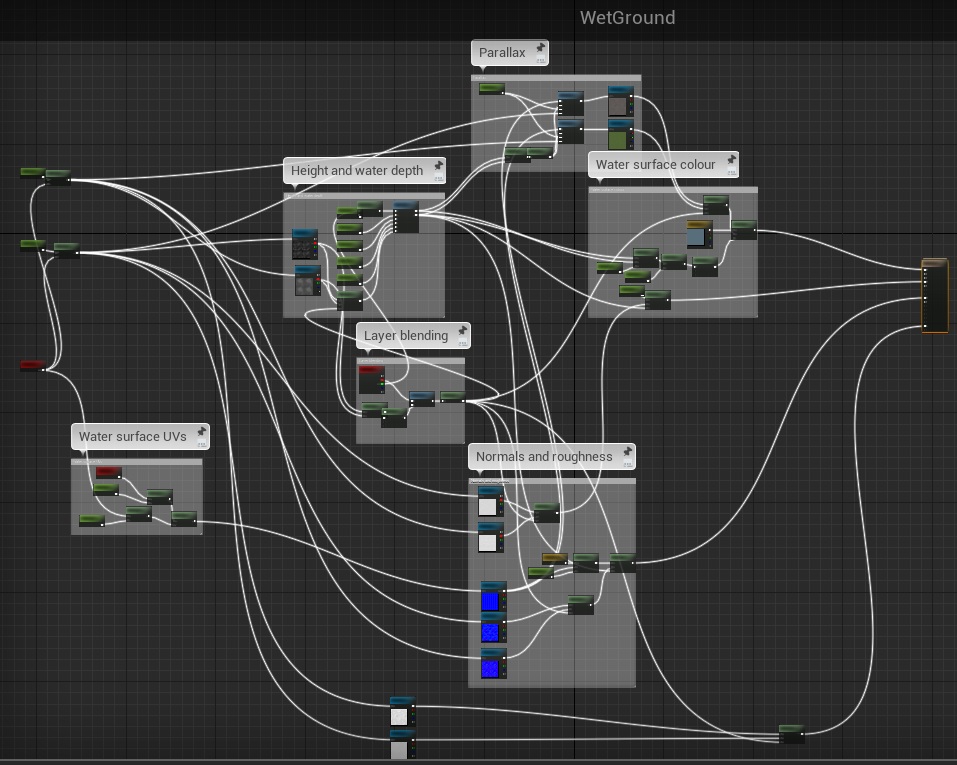
It’s messy, but can be summarized roughly:
- Two layers of materials for the ground texture (I’m using a muddy/rocky material and a grass material), each with:
- Normals
- Height
- Albedo
- Roughness
- Ambient Occlusion
- Vertex colours for blending between the two layers
- Vertex colour used for keeping some areas dryer than others, to break up the effect
- A normal map and colour for the water surface (blended in by depth)
I know it’s not an entirely useful image, but here is the material:
All of the more important bits which are in material functions a bit further down. If anyone wants to see the whole network, I’ll take the time to screenshot it properly, and stitch it all together 🙂
Here’s a view showing some of the areas broken up with vertex painting (the two material layers, some dry areas, etc):
The two layer blending is mostly identical in setup to the checker plate material I mentioned at the top.
The only difference being the height values, which get blended together and this resulting height is the main input for the water surface (as well as for breaking up the blending, so that tall rocks stick out a bit from the vertex blend).
Modo the things until they are Modo’d
I decided to make all of the textures procedurally.
A smarter man probably would have used the Substance tools, or ZBrush, or Houdini. Or photo source for that matter.
I’m not that guy, I’m Modo guy!! 😛
So I used two layers of fur to make the grass, along with a bunch of procedural noise layers.
Nothing too exciting, but here’s the shader network:
The muddy rocky stuff was a rock in a replicator and a whole bunch of “flow bozo” displacement maps, because they are awesome:
So yeah, I’m not going to win any amazing texture art of the year awards.
I could spend a bit more time on them, or use them as a paint-over base, but I’ve got pretty lazy with this side project now so I didn’t even bother fixing seams 🙂
But, at least it gives me pretty accurate height data to play with, which is important for water-ness!
Water Level
The current water level is passed into the material, and is used to threshold the height map, to work out where the water is.
It might help to visualise this in Photoshop. So let’s pretend we have a height map that has a bunch of dents in it, and the dents will fill up first:
If you put a folder above it with a Threshold adjustment layer (and an invert), you can drag the threshold around to see the water level rise (black is no water, white is water):
This is essentially how I’m controlling the water level in the material, but I’m not clamping the values to give a hard edge. I’ve moved this into a function, to clean up the main material graph a little:
As a side note, the first shader of mine I saw running in a game was a threshold effect like this to make oil run down the side of a plane.
It was for Heroes Over Europe, and was on one of the programmers’ machines, and was ousted for a better approach almost immediately. I was very grateful that she got it in game for me, up until that point I’d just been throwing shaders at 3dsMax. It set me on the path for doing quite a bit of shader work for the next few years 🙂
Anyway…
You’ll notice I’m putting out two return values here: Mask and Depth. The Depth is very similar to the mask, but does not use the falloff value, so it essentially “how far is this pixel from the current water level”. I use this Depth value to tint the water with a bias, so that I can have muddy puddles that are a clearer where they are shallow.
It’s pretty subtle, so it may be an unnecessary complication, but here’s an example making it a little more obvious:
The water also has a sine wave running over the height, just to give it a little bit of ebb and flow.
Refraction
Right, so, with the water height determined, I can then use the depth of the water for a fake refraction effect.
This is usually where I’d pull out the BumpOffset node, but it uses height maps, and I had a Normal map handy for the water surface.
I made a simple normal based parallax function, just because I’ve had good results with this for various materials (including the UI) on Ashes Cricket 2009, and various previous attempts at rivers and water effects in other games.
Although I’m only using a single transparent layer, my go-to paper has always been “Rendering Gooey Materials with Multiple Layers” by Chris Oat, from Siggraph 2006, just because it has a really nice clear example for parallax offset.
So here’s my parallax offset function:
Please pretend that “Vector_Reflect” is a “CustomReflectionVector” node, btw.
I rolled my own vector reflection node because I didn’t notice CustomReflectionVector… I think I saw that it had an input of CameraVector, and that threw me off, and I’ve only just realised while writing this blog post…
So the parallax function outputs distorted UVs, and these UVs are used to look up the colour textures for the grass and mud. The water normal is just scrolling in one direction, but that seems to give a good enough distortion effect.
Taking it further
So, it was fun to work on for a few days, but there’s plenty of things to do to expand/improve on it visually (including getting a real artist to make the textures :P):
- Use UE4’s flow maps to make the water flow around objects.
- Use the back buffer (or last frame) as an input to the shader for refraction. This would be necessary if you wanted to have things sink into the water a little, and be refracted.
- Get lighting to work above and below water (lighting is done based off the water surface normal, currently). This might be fixed by the previous improvement, if I can render and light the below water layer, then render the water surface using forward rendering and distort the already lit stuff below.
Multiple lit layers are always a bit of a pain in deferred rendering. - It would be really cool if I could have a dynamic texture that I could render height values into, and multiply it on top of the height in the material.
That way, I could create dynamic ripples, splashes, impact effects, etc!
Not really sure how I’d go about that in UE4, but it would be neat.
I’m not going to do any of those things, however, because I need to stop getting distracted and get back to my Half Life scene.
Hopefully more on that soon, but this has been a nice side-track 🙂


One thought on “Rising damp”